What is ‘tput sgr0’ doin in my Bash prompt?

I have a new work computer, so this time around, I’m doing everything from scratch, because that’s the best way to learn.

In playing with my Bash prompt, I used this site to generate the prompt: http://bashrcgenerator.com/

Another one that is great is here: http://ezprompt.net/

The prompt that is generated uses a command to clear the text color that I hadn’t seen before: tput sgr0

My prompt (which I put in the ~/.bash_profile file) is:

#PROMPT
# To enter an emoji, while in insert mode type Ctrl-v, then enter the UTF8 code
# for the emoji, ex. U26A1 (note, use capital letters), then type ESC key. You
# can get a list of UTF8 emoji codes here: http://graphemica.com/
export PS1="\[\033[38;5;39m\]\u\[$(tput sgr0)\]\[\033[38;5;15m\]@\[$(tput sgr0)\]\[\033[38;5;229m\]\h\[$(tput sgr0)\]\[\033[38;5;15m\] [\[$(tput sgr0)\]\[\033[38;5;76m\]\w\[$(tput sgr0)\]\[\033[38;5;15m\]]\n\[$(tput sgr0)\]\[\033[38;5;215m\]⚡\[$(tput sgr0)\] "

So, of course, I spent the next 40 minutes trying to figure out all I could about that command, and more specifically, what ‘sgr’ meant.

I first scoured Google search results. Mostly just information about tput. Then I took to the manual pages: man tput was helpful in learning about what tput does. That led to man terminfo and finally to man ncurses. None of those man pages define ‘sgr’, but ‘ncurses’ did give a better clue by stating that “The  ncurses  library can exploit the capabilities of terminals which implement the ISO-6429 SGR 39 and SGR 49 controls”

So a Google search of ‘ISO-6429 SGR 39’ turns up an old 1990’s ECMA standardization for “Control Functions and Coded Character Sets”, Standard ECMA-48, https://www.ecma-international.org/publications/files/ECMA-ST/Ecma-048.pdf

(More on ECMA history here: https://www.ecma-international.org/memento/history.htm) [sidenote: ECMA may sound familiar. ECMAScript. Wait isn’t that Javascript? See here: https://medium.freecodecamp.org/whats-the-difference-between-javascript-and-ecmascript-cba48c73a2b5]

And there we go! Page 75 of the PDF (page 61 internally numbered), section 8.3.117!

SGR – SELECT GRAPHIC RENDITION

And the 0 means = “default rendition (implementation-defined), cancels the effect of any preceding occurrence of SGR in the data stream regardless of the setting of the GRAPHIC RENDITION COMBINATION MODE (GRCM)”

To make things a little more readable, I made the color codes into variables:

#PROMPT
# To enter an emoji, while in insert mode type Ctrl-v, then enter the UTF8 code
# for the emoji, ex. U26A1 (note, use capital letters), then type ESC key. You
# can get a list of UTF8 emoji codes here: http://graphemica.com/
BLUE='\[\033[38;5;39m\]'
PALE_YELLOW='\[\033[38;5;229m\]'
RESET='\[$(tput sgr0)\]'
GREEN='\[\033[38;5;76m\]'
export PS1="${BLUE}\u${RESET}@${PALE_YELLOW}\h${RESET} [${GREEN}\w${RESET}]\n⚡${RESET} "

And there we go. Much too much time learning stuff! And my prompt looks like this:


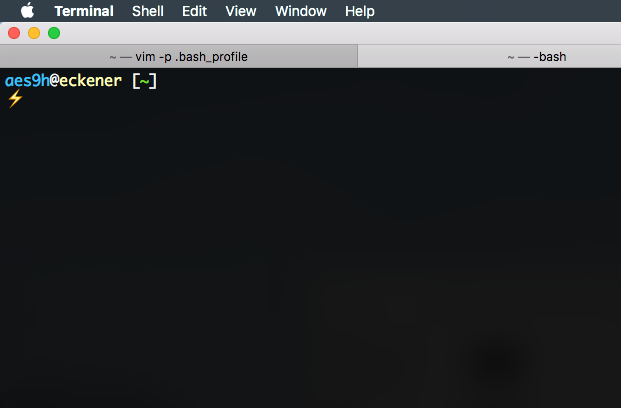
And all of that to figure out what ‘sgr’ means.

Quick WP upgrading with WPCLI

This is the easiest way to upgrade WordPress. You’ll execute these commands on the server itself.

Requirements

  • ssh access to your server
  • wp-cli command installed (instructions for installing wp-cli at http://wp-cli.org/)

Install/Upgrade WP CLI

  • wp-cli should be upgraded each time a WordPress installation is upgraded.
wp cli update

Upgrade WP

Prep work

Change into the WP directory

cd /path/to/wordpress/installation/

Make a list of active plugins

wp plugin list --status=active --format=csv --fields=name | tail -n +2 > ../active-plugins.txt

Update all plugins

wp plugin update --all

Deactivate all of the plugins

wp plugin deactivate --all

Upgrade WordPress

wp core update

Reactivate all of the previously active plugins.

cat ../active-plugins.txt | xargs wp plugin activate

Check the site in various browsers (make sure cache has been cleared).

Grab all of the domain names in Apache host file

Quick script I whipped up today to grab all of the domain names on a server.

#!/bin/bash

if [ -e alldomains ]
then
  rm alldomains
fi

alldomains=( $(find /etc/httpd/conf.vhosts/ -name *.conf) )

for domain in ${alldomains[*]}
do
  cat $domain | egrep "ServerName|ServerAlias" | egrep -v "#" | sed -e 's|ServerName||' -e 's|ServerAlias||' -e 's|www.||' -e 's|:80||' | tr -s ' ' '\n' | tr -d ' ' | sed -e '/^\s*$/d' >> alldomains
done

sort alldomains | uniq | sort -o alldomains


This gets all of the domains from ServerName and ServerAlias lines, takes out all of the white space and empty lines, and creates a file with just a list of the unique domain names.

This accounts for subdomains that use ‘www’ or have port :80 on the end.

For instance, www.somedomain.com and somedomain.com are the same, so the script takes out the ‘www.’ which leaves to copies of somedomain.com, which it then deletes one of them in the final output to the file. The same for ‘:80’.


Atop – Apache Top, for keeping tabs on the web servers

When I first became a systems administrator of a large web server, I wanted to know what the current traffic to all of the virtual hosts (vhosts) looked like. I wanted to see which domains were getting the most traffic and where that traffic was coming from. So began my long search for a sufficient tool. There are many out there (apache-top, Apachetop, wtop, htop, IPTraf, etc). But they didn’t do all of the things I wanted. Basically they were just command line versions of the output of Apache mod_status, or they did complex log analysis.

I wanted more. The ability to search, or show only a certain domain name, see a list of IP address and how many connections from that IP address (to detect botnet attacks), and more.

So in true sys admin fashion, I built the tool myself. It is sufficiently stable and usable enough to warrant a blog post and hopefully engender some usage by others, which hopefully will encourage ideas and improvements from the community. Go ahead and grab a copy from the github repo, https://github.com/mossiso/atop

My idea is not much different than some of the tools I linked to. I’m basically writing a wrapper around the Apache mod_status output, but this tool has the ability to do more. So here’s a little walk through of what this tool does.

Requirements

  • Apache with mod_status: This tool is built around the Apache mod_status output, so that obviously has to be installed and set up. The ExtendedStatus option has to be enabled in the httpd.conf file.
  • links: This is a command line based web browser of sorts. Using the -dump flag, it just spits out the page to the command line.
  • netstat: This is used for one of the options to display all of the IPs connected to the webserver (via port 80).


This tool is just a BASH script, so once you download the “atop” file, just plop it anywhere in your home directory on your web server, change the permissions so it is executable

[code lang=”bash”]chmod 700 atop[/code]

and run it

[code lang=”bash”]./atop[/code]

There are now several options you can sort the results by:

==============================================================
a = sort all threads by time
c = sort by CPU, no GCRK_
i = list IPs connected to port 80 (uses Apache Server Status)
k = sort by K (Keep alives)
l = list IPs connected to all ports (uses netstat)
n = list IPs connected to port 80 (uses netstat)
o = sort open connections by CPU
p = sort only POST threads by time
r = raw apache status output (good with limit of at least 50)
s = search for a term, returns raw Apache Server Status results
w = sort by inactive workers
q = quit

To see the list of options while the command is running, just type any key on the keyboard.

Getting the BASH script to be responsive to the keyboard was tricky, and took me the longest time to figure out. For a while I could get the results to be displayed and refresh every N seconds, I could even get it to do the sort options, but only if I started the script with that option. So I was super excited to figure out the logic to get the script to respond to input.

The trick lies in setting the output commands in an infinite while loop. At the end of the loop it does a regular bash prompt using “read”. Normally this waits for a response, but the timeout feature allows you to set that to one second, which then goes through the while loop again. If a key is pressed, it breaks the while loop and prints the options message. When an option is selected it goes through that while loop.

Features

Some of the sort options I use most often are POST (p), CPU (c), IPs according to Apache (i), and IPs according to the server (n). I walk through those one by one.

POST

POST-listing

This is probably the most helpful of the options. Usually, when a website is getting hammered, it’s because it is getting comment spam or login attempts. These all require POST requests. If you see a large number of POST requests for a single vhost, then look at the IP addresses sending the requests; you can bet if all the requests are from the same IP, that it should be blocked.

CPU

CPU-list

This is a pretty good overview of what Apache traffic your server is handling. It shows GET and POST requests and sorts them with the most heavy CPU usage requests on the bottom. It filters out open processes with no connections, and a few other things like closing connections.

IPs (Apache)

IP-Apache-list

This one is great, too. It shows the IP addresses that are connected to Apache, and sorts them by how many connections are being made. The IPs with the most connections are at the bottom. If you see an IP address with over 10 connections for a few minutes, you can bet they are up to no good. Double check with the POST option to see if they are spamming.

IPs (Netstat)

IP-Netstat-list

This option gets all traffic to port 80 using netstat. It filters out local traffic (and GMU traffic, but you can edit that out), and then does the sorting and organizing by how many IP addresses are connecting. This gives a little more detail than the other IP option.

If you find any bugs in the script or have a great idea for other options, feel free to fork or submit patches, or report bugs on the github repo.

The Mouse, the Screen, and the Vim

A tale many years in the making…

I have been lacking two things for so long, now that I can do it, I wonder if I will ever remember to use it!

The Problem

I use a MacBook Pro with OS X Mavericks. I log into my Linux servers with SSH. I use GNU screen to allow me to save sessions, detach, and come back later without closing running programs and what not. BUT, I can’t use the mouse scrolling for the terminal output or to scroll through files opened with Vim.

The Solution

I finally found the pieces missing to make this possible. All with a couple of lines of code and a new SIMBL bundle.

To get the scroll working in screen, just add this line to your .screenrc


defscrollback 5000
termcapinfo * ti@:te@


It’s not perfect. If you have multiple windows in a screen session, then the history buffers get all meshed together. But I usually just need to see info from a command output that is longer than the screen window, and this will let me see it. Finally! Thanks Slapitjack! See here for an explanation of the code.

To get the scroll back in Vim, whether using screen or not. You first need to install SIMBL. The version for Snow Leopard works with Mavericks. Then grab a copy of MouseTerm. The installer didn’t work, but you just need to copy the MouseTerm.bundle to /Library/Application Support/SIMBL/Plugins folder (or ~/Library/Application Support/SIMBL/Plugins if needed for just your user account). Restart your Terminal and you’re good to go.

Viola! Vim and scrolling, GNU screen and scrolling! Live as it was meant to be…

OSSEC, Suhosin, and WordPress

I had a problem show up on some of our servers. Visiting sites would work fine, but as soon as you log in to a WordPress site, then your IP was blocked at the firewall level. It took a bit of hunting around the OSSEC logs to figure out the cause, and then finally tipped off to a local rule to combat the blockage. I outline the process of figuring out what was wrong, and how to fix it below.

DENIED!

gareth-davies-logo3So initially, this was quite confusing. All of a sudden people would have their IP blocked. I checked the different sites, and seemed to have no problem. Then when I logged in to the back end, BAM, blocked as well. We have Shorewall running, so doing:

shorewall show dynamic

Showed all of the IPs that Shorewall had blocked. This could also be done by using iptables

iptables -nL --line-numbers

Sure enough, my IP had been blocked. I unblocked my IP with:

shorewall allow ip.ad.dr.es

Or could also do

iptables -D INPUT 2

where INPUT is the position or section of the firewall chain, and “2” is the line number containing my IP address.

Then I checked with other web applications on that server. Where they also causing an issue? I logged in to an Omeka install. No problems.

FOUND IT!

ossec_logoOK. I know OSSEC is to blame some how. It’s an awesome HIDS (Host Intrusion Detection Software) that actively responds to issues on the server based on scanning through the system logs and various rules.

OSSEC keeps itself chroot’ed to /var/ossec/, so all of the ossec logs are located in /var/ossec/logs/.

I first looked in the /var/ossec/logs/active-responses.log. Sure enough, a couple of lines like this show my IP being completely blocked to the server.

Fri Jun 14 06:50:47 EDT 2013 /var/ossec/active-response/bin/host-deny.sh add - XXX.XX.XX.XX 1371207047.5913585 20101
Fri Jun 14 06:50:47 EDT 2013 /var/ossec/active-response/bin/firewall-drop.sh add - XXX.XX.XX.XX 1371207047.5913585 20101

So, there we are. OSSEC blocking the IP for some reason. Now why is it blocking the IP?

Taking a look in the /var/ossec/logs/alerts/alerts.log file to see why it thinks it needs to block the IP…

** Alert 1371206381.5698606: - ids,
2013 Jun 14 06:39:41 (server1) 127.0.0.1->/var/log/messages
Rule: 20101 (level 6) -> 'IDS event.'
Src IP: XXX.XX.XX.XX
Jun 14 06:39:40 server1 suhosin[18563]: ALERT - script tried to increase memory_limit to 268435456 bytes which is above the allowed value (attacker 'XXX.XX.XX.XX', file '/var/html/wp-admin/admin.php', line 109)

There were other lines in there with my IP, but nothing would/should have caused blocking, like a WordPress login event, or an SSH login event. Also, the error above is categorized as an IDS event with level 6, which by default OSSEC rules means it gets blocked.

HOW TO FIX IT!

As a quick fix, I changed the “suhosin.memory_limit” option in /etc/php.d/suhosin.ini to 256M, and the “memory_limit” in /etc/php.ini to 256M so that no error would be generated.

Now came the hard part of finding out how to fix it for real. OSSEC is a pretty big beast to tackle, so I turned to my friendly web search engine to help out.

To fix the issue, I would need to write a decoder or new rule to ignore the suhosin rule causing the problem. OSSEC has descent documentation to get you started, but fortunately the blog linked above had the solution already. https://www.atomicorp.com/forum/viewtopic.php?f=3&t=5612

From user ‘faris’ in the forum linked above:

Add the following lines the the /var/ossec/etc/rules.d/local_rules.xml file.

<group name="local,ids,">
  <!-- First Time Suhosin event rule -->
  <rule id="101006" level="14">
    <if_sid>20100</if_sid>
    <decoded_as>suhosin</decoded_as>
    <description>First Time Suhosin Event</description>
  </rule>
  <!-- Generic Suhosin event rule -->
  <rule id="101007" level="12">
    <if_sid>20101</if_sid>
    <decoded_as>suhosin</decoded_as>
    <description>Suhosin Event</description>
  </rule>
  <!-- Specific Suhosin event rule -->
  <rule id="101008" level="5">
    <if_sid>101006,101007</if_sid>
    <match>script tried to increase memory</match>
    <description>Suhosin Memory Increase Event</description>
  </rule>
</group>

What these new rules do is change the level of the default rules that were tagged/decoded as being suhosin errors. In the first rule, if the default error is 20100, and is decoded (or tagged, or matches) as suhosin, then set the level to 14 instead of the default 8.

The second rule detects if the default error 20101 is decoded as coming from suhosin and sets the level to 12 instead of the default 6.

The third new rule looks at any error tagged as suhosin and if the error has the matching text in it, then it sets the error level to 5 (below the limit for firing an active response).

So, just add that group of rules to the local_rules.xml file and restart the OSSEC service. BA-DA-BING! no more blocking the IP when logging in to WordPress.