Grab all of the domain names in Apache host file

Quick script I whipped up today to grab all of the domain names on a server.

#!/bin/bash

if [ -e alldomains ]
then
  rm alldomains
fi

alldomains=( $(find /etc/httpd/conf.vhosts/ -name *.conf) )

for domain in ${alldomains[*]}
do
  cat $domain | egrep "ServerName|ServerAlias" | egrep -v "#" | sed -e 's|ServerName||' -e 's|ServerAlias||' -e 's|www.||' -e 's|:80||' | tr -s ' ' '\n' | tr -d ' ' | sed -e '/^\s*$/d' >> alldomains
done

sort alldomains | uniq | sort -o alldomains


This gets all of the domains from ServerName and ServerAlias lines, takes out all of the white space and empty lines, and creates a file with just a list of the unique domain names.

This accounts for subdomains that use ‘www’ or have port :80 on the end.

For instance, www.somedomain.com and somedomain.com are the same, so the script takes out the ‘www.’ which leaves to copies of somedomain.com, which it then deletes one of them in the final output to the file. The same for ‘:80’.


OSSEC, Suhosin, and WordPress

I had a problem show up on some of our servers. Visiting sites would work fine, but as soon as you log in to a WordPress site, then your IP was blocked at the firewall level. It took a bit of hunting around the OSSEC logs to figure out the cause, and then finally tipped off to a local rule to combat the blockage. I outline the process of figuring out what was wrong, and how to fix it below.

DENIED!

gareth-davies-logo3So initially, this was quite confusing. All of a sudden people would have their IP blocked. I checked the different sites, and seemed to have no problem. Then when I logged in to the back end, BAM, blocked as well. We have Shorewall running, so doing:

shorewall show dynamic

Showed all of the IPs that Shorewall had blocked. This could also be done by using iptables

iptables -nL --line-numbers

Sure enough, my IP had been blocked. I unblocked my IP with:

shorewall allow ip.ad.dr.es

Or could also do

iptables -D INPUT 2

where INPUT is the position or section of the firewall chain, and “2” is the line number containing my IP address.

Then I checked with other web applications on that server. Where they also causing an issue? I logged in to an Omeka install. No problems.

FOUND IT!

ossec_logoOK. I know OSSEC is to blame some how. It’s an awesome HIDS (Host Intrusion Detection Software) that actively responds to issues on the server based on scanning through the system logs and various rules.

OSSEC keeps itself chroot’ed to /var/ossec/, so all of the ossec logs are located in /var/ossec/logs/.

I first looked in the /var/ossec/logs/active-responses.log. Sure enough, a couple of lines like this show my IP being completely blocked to the server.

Fri Jun 14 06:50:47 EDT 2013 /var/ossec/active-response/bin/host-deny.sh add - XXX.XX.XX.XX 1371207047.5913585 20101
Fri Jun 14 06:50:47 EDT 2013 /var/ossec/active-response/bin/firewall-drop.sh add - XXX.XX.XX.XX 1371207047.5913585 20101

So, there we are. OSSEC blocking the IP for some reason. Now why is it blocking the IP?

Taking a look in the /var/ossec/logs/alerts/alerts.log file to see why it thinks it needs to block the IP…

** Alert 1371206381.5698606: - ids,
2013 Jun 14 06:39:41 (server1) 127.0.0.1->/var/log/messages
Rule: 20101 (level 6) -> 'IDS event.'
Src IP: XXX.XX.XX.XX
Jun 14 06:39:40 server1 suhosin[18563]: ALERT - script tried to increase memory_limit to 268435456 bytes which is above the allowed value (attacker 'XXX.XX.XX.XX', file '/var/html/wp-admin/admin.php', line 109)

There were other lines in there with my IP, but nothing would/should have caused blocking, like a WordPress login event, or an SSH login event. Also, the error above is categorized as an IDS event with level 6, which by default OSSEC rules means it gets blocked.

HOW TO FIX IT!

As a quick fix, I changed the “suhosin.memory_limit” option in /etc/php.d/suhosin.ini to 256M, and the “memory_limit” in /etc/php.ini to 256M so that no error would be generated.

Now came the hard part of finding out how to fix it for real. OSSEC is a pretty big beast to tackle, so I turned to my friendly web search engine to help out.

To fix the issue, I would need to write a decoder or new rule to ignore the suhosin rule causing the problem. OSSEC has descent documentation to get you started, but fortunately the blog linked above had the solution already. https://www.atomicorp.com/forum/viewtopic.php?f=3&t=5612

From user ‘faris’ in the forum linked above:

Add the following lines the the /var/ossec/etc/rules.d/local_rules.xml file.

<group name="local,ids,">
  <!-- First Time Suhosin event rule -->
  <rule id="101006" level="14">
    <if_sid>20100</if_sid>
    <decoded_as>suhosin</decoded_as>
    <description>First Time Suhosin Event</description>
  </rule>
  <!-- Generic Suhosin event rule -->
  <rule id="101007" level="12">
    <if_sid>20101</if_sid>
    <decoded_as>suhosin</decoded_as>
    <description>Suhosin Event</description>
  </rule>
  <!-- Specific Suhosin event rule -->
  <rule id="101008" level="5">
    <if_sid>101006,101007</if_sid>
    <match>script tried to increase memory</match>
    <description>Suhosin Memory Increase Event</description>
  </rule>
</group>

What these new rules do is change the level of the default rules that were tagged/decoded as being suhosin errors. In the first rule, if the default error is 20100, and is decoded (or tagged, or matches) as suhosin, then set the level to 14 instead of the default 8.

The second rule detects if the default error 20101 is decoded as coming from suhosin and sets the level to 12 instead of the default 6.

The third new rule looks at any error tagged as suhosin and if the error has the matching text in it, then it sets the error level to 5 (below the limit for firing an active response).

So, just add that group of rules to the local_rules.xml file and restart the OSSEC service. BA-DA-BING! no more blocking the IP when logging in to WordPress.

CentOS 6, iDrac6 and PowerEdge R510

  1. RedHat changed an important part of their system with the upgrade from version 5 to 6. This affects CentOS which is the same thing, but rebranded.

I was updating one server to use CentOS 6, and ran into this issue of setting up the iDRAC for remote console use. In previous versions, I would add a line to the /etc/inittab file. This is now unused. RedHat is favoring the “Upstart” system developed by and for Ubuntu. It starts services on request, rather than all at once.

So here is how I set up my Dell PowerEdge R510 with CentOS 6 to use the iDRAC6.

Info was taken from the RedHat manual, the Dell iDRAC manual, and probably a bunch of other sites that I googled for.

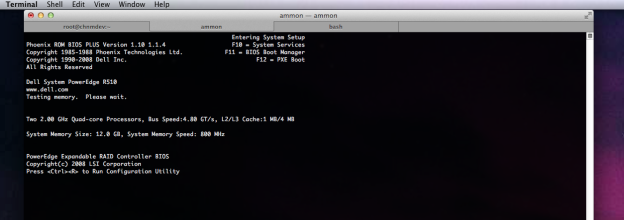
These steps are by no means comprehensive or detailed. I barely even know what’s going on myself, but it seems to work. It’s kind of cool to see a system boot up in your terminal. It’s like your terminal turns into a monitor connected to the server.

Setting up the iDrac6

Edit BIOS

  1. Boot the server.
  2. Press F2 to enter the BIOS setup utility during POST.
  3. Scroll down and select Serial Communication by pressing <Enter>.
  4. Set the Serial Communication screen options as follows:
    • serial communication....On with serial redirection via com2
    • NOTE: You can set serial communication to ‘On with serial redirection via com1’ as long as the serial port address field, serial device2, is set to com1, also.
    • serial port address....Serial device1 = com1, serial device2 = com2
    • external serial connector....Serial device 1
    • failsafe baud rate....57600
    • remote terminal type....vt100/vt220
    • redirection after boot....Enabled
  5. Save the changes and exit.

Edit iDRAC settings

  1. Turn on or restart your system.
  2. Press <Ctrl><E> when prompted during POST. If your operating system begins to load before you press <Ctrl><E>, allow the system to finish booting, and then restart your system and try again.
  3. Configure the LOM.
  1. Use the arrow keys to select LAN Parameters and press <Enter>. NIC Selection is displayed.
  2. Use the arrow keys to select one of the following NIC modes:
    • Dedicated — Select this option to enable the remote access device to utilize the dedicated network interface available on the iDRAC6 Enterprise. This interface is not shared with the host operating system and routes the management traffic to a separate physical network, enabling it to be separated from the application traffic. This option is available only if an iDRAC6 Enterprise is installed in the system. After you install the iDRAC6 Enterprise card, ensure that you change the NIC Selection to Dedicated. This can be done either through the iDRAC6 Configuration Utility, the iDRAC6 Web Interface, or through RACADM.
  • Configure the network controller LAN parameters to use DHCP or a Static IP address source.
  1. Using the down-arrow key, select LAN Parameters, and press <Enter>.
  2. Using the up-arrow and down-arrow keys, select IP Address Source.
  3. Using the right-arrow and left-arrow keys, select DHCP, Auto Config or Static.
  4. If you selected Static, configure the Ethernet IP Address, Subnet Mask, and Default Gateway settings.
  5. Press <Esc>.
  • Press <Esc>.
  • Select Save Changes and Exit.

Set up Linux OS (to do after OS is installed)

  • Configuring Linux for Serial Console Redirection During Boot
  • The following steps are specific to the Linux GRand Unified Bootloader (GRUB). Similar changes would be necessary if you use a different boot loader.
  • NOTE: When you configure the client VT100 emulation window, set the window or application that is displaying the redirected console to 25 rows x 80 columns to ensure proper text display; otherwise, some text screens may be garbled.
  1. Make a copy of the /boot/grub/grub.conffile as follows:cp /boot/grub/grub.conf /boot/grub/grub.conf.orig
  2. Edit the /boot/grub/grub.conf file as follows:
  1. Locate the General Setting sections in the file and add the following two new lines:serial --unit=0 --speed=57600terminal --timeout=10 serial console
  2. Append two options to the kernel line:kernel ............. console=ttyS1,57600 console=tty1
  3. If the /etc/grub.conf contains a splashimage directive, comment it out.Sample File: /boot/grub/grub.conf
    #  grub.conf generated by anaconda
    #
    #  Note that you do not have to rerun grub after making changes to this file
    #  NOTICE: You have a /boot partition. This means that
    #  all kernel and initrd paths are relative to /boot/, eg.
    #  root (hd0,0)
    #  kernel /vmlinuz-version ro root=/dev/Logical1/LogVol00
    #  initrd /initrd-version.img
    #boot=/dev/sda
    default=0
    timeout=5
    #splashimage=(hd0,0)/grub/splash.xpm.gz
    #hiddenmenu
    serial –unit=1 –speed=57600
    terminal –timeout=5 console serialtitle CentOS (2.6.18-164.11.1.el5) SOL Redirection
    root (hd0,0)
    kernel /vmlinuz-2.6.18-164.11.1.el5 ro root=/dev/Logical1/LogVol00 console=tty1 console=ttyS1,57600
    initrd /initrd-2.6.18-164.11.1.el5.img
    title CentOS (2.6.18-164.el5)
    root (hd0,0)
    kernel /vmlinuz-2.6.18-164.el5 ro root=/dev/Logical1/LogVol00
    initrd /initrd-2.6.18-164.el5.img

Enabling Login to the Console After Boot

  1. Create a new /etc/init/serial-ttyS1.conffile.Sample File: /etc/inittab
    #  This service maintains a getty on /dev/ttyS1.start on stopped rc RUNLEVEL=[2345]
    stop on starting runlevel [016]respawn
    exec /sbin/agetty -h -L 57600 ttyS1 vt102

Edit the file /etc/securetty

  1. Make a copy of the /etc/securettyfile as follows:cp /etc/securetty /etc/securetty.orig
  2. Edit the file /etc/securettyas follows:Add a new line with the name of the serial tty for COM2:ttyS1Sample File: /etc/securetty
    vc/1
    vc/2
    vc/3
    vc/4
    vc/5
    vc/6
    vc/7
    vc/8
    vc/9
    vc/10
    vc/11
    tty1
    tty2
    tty3
    tty4
    tty5
    tty6
    tty7
    tty8
    tty9
    tty10
    tty11
    *ttyS1*

Redirect the video output over ssh connections

Starting a Text Console Through SSH (Remote Access, SOL)

To connect to the managed system text console, open an iDRAC6 command prompt (displayed through an SSH session):

ssh root@xxx.xxx.xxx.xxx

and type:

console com2

Only one console com2 client is supported at a time. The console -h com2 command displays the contents of the serial history buffer before waiting for input from the keyboard or new characters from the serial port.

To exit the console type these three keys: <Ctrl ><Shift >\

The default (and maximum) size of the history buffer is 8192 characters. You can set this number to a smaller value using the command:

racadm config -g cfgSerial -o cfgSerialHistorySize < number >

Making SMF static

We have a few legacy forums powered by the good software SMF (SimpleMachines Forum). Like many of the WordPress installs, it’s a pain and a security risk to keep these up-to-date when they are no longer needed as content creation platforms. So, once again I need to convert a web app into static HTML pages. This process proved a bit harder than converting WordPress to static HTML.

Step 1: Upgrade

The first thing to do is update to the latest version. This ensures that if you need to turn this back into a dynamic site, it should hopefully be compatible with whatever the latest version is at that time.

Step 2: Make it public

Next, we’ll need to make it public to guests, so that wget has access to the pages.

Go to the Admin->Features and Options page and check the “Allow guests to browse the forum” box, then click save. Now we have to change the permissions on each board separately. Or with a bit of MySQL magic, we can change them all at once using the CONCAT operator. Open of phpMyAdmin, or something else of your choice. Before we mess with the data, make a copy of the table, just in case we totally hose it.

Browse to the ‘boards’ table, and then to the SQL tab. We’re going to enter an SQL command that will pre-pend (that’s append but onto the front rather than the end) some data.

UPDATE boards SET member_groups=CONCAT('-1,', member_groups) WHERE 1


This will add a -1, to the beginning of each field, which makes the board viewable by guests. No need to log in, which means wget can scrape the pages and turn them into HTML.

Step 3: Edit Theme files

Now we get to play around with the theme files to get rid of forum specific items that we won’t need, like links to member info, the login, help, and search links, and anything else that we don’t want.

Here are some items to delete or alter, and the files I found them in for our home-made theme based off of an old default theme.

index.template.php

  • Add a title
  • Get rid of date stamp
  • Get rid of the main menu (Home, Help, Search, Login, etc)

BoardIndex.template.php

  • Search for [‘member’][‘link’] and change it to [‘member’][‘name’] This will take out all links to member profile pages.

Display.template.php

  • Search for [‘member’][‘link’] and change it to [‘member’][‘name’] This will take out all links to member profile pages.
  • Get rid of the drop down menu to select pages.

MessageIndex.template.php

  • Search for [‘member’][‘link’] and change it to [‘member’][‘name’] This will take out all links to member profile pages.
  • Delete the ‘Jump to’ drop-down box and the icons explaining post/board types

Step 4: Fix the URLs

As it stands, SMF has some pretty ugly URLs. There are a couple of mods that I could never get to work. But editing a file and adding an .htaccess file seems to do the trick.

Open the Sources/QueryString.php file and look for the line like this:

$scripturl = $boardurl . '/index.php';

and get rid of the /index.php

Now create a .htaccess file in the root of the forum (in the same folder as the Settings.php file). It should look similar to this:

RewriteEngine On
RewriteBase /7tah/forum/
RewriteCond %{REQUEST_FILENAME} !-f
RewriteCond %{REQUEST_FILENAME} !-d
RewriteRule . /7tah/forum/index.php [L]


Step 5: Wget it

Now we run wget on the command line to grab the pages.

wget --mirror -P static-forum -nH -np -p -k -E --cut-dirs=2 http://domain.com/path/forum/

All of the static HTML files will now be located in a directory called static-forum.

Step 6: Fix filenames

Some filenames will be a bit broken. Specifically the style.css has an extra “?fin11” in the html files where the file is called. Also, it get’s name that way. So fix that by changing the name of the file to just style.css (it’s in your Theme directory). Then run this one-line command to search and replace throughout all of the static html files (run the command when you are in the static-forum directory.

find . -name '*.html' -type f -exec perl -pi -e 's/style.css%3Ffin11/style.css/g' {} \;


This will look for all of the references to the style.css%3Ffin11 file and change them to style.css. Then the pretty colors and formatting will work. Just for clarification, the %3F is code for a question mark. It shows up as such in the HTML source when viewing from a browser, but is displayed as such in the actual code.

Don’t forget to change the the actual name of the css file to style.css.

Step 7: Protect it

Depending on  your needs, you may want to password protect your new static forum with an htaccess account. The good peoples at Dynamic Drive have an helpful tool for making the two files necessary to make this happen. Just plug in your desired user name, password, and location of the htpasswd file, and then it’s copy and paste into those files on the server.

I change the last line of the htaccess file to require user username so that it works only with the given user, not any valid. But since it only pulls from the specified htpasswd file, it’s kind of pointless.

Step 8: Backup the old

It’s a good idea to make a backup of the database and site files before getting rid of them. I just make a mysqldump of the database, throw it in the forum folder, and then make a tar or zip file of that and put the file in the new static forum folder for safe keeping.

Step 9: That’s it.

Sit back and relax. Your forum is interactive no longer.