“I can’t blab such blibber blubber!
My tongue isn’t make of rubber.”
That’s what my brain felt like after trying to figure all of the options for Apache and PHP. To combat my rubber brain, I created this flow-chart to help me keep track of the options, the pros and cons for each, and the path I finally chose.
First off, a list of requirements and goals:
- Chroot each vhost to it’s own directory, and have Apache and PHP run on that vhost’s server account
- Speed, run Apache and PHP at their most effective and efficient levels
- Utilize an opcode cache, APC, to speed up PHP pages
- Use trusted repositories to make installation and upgrading easier
Here’s what I eventually figured out about Apache and PHP:
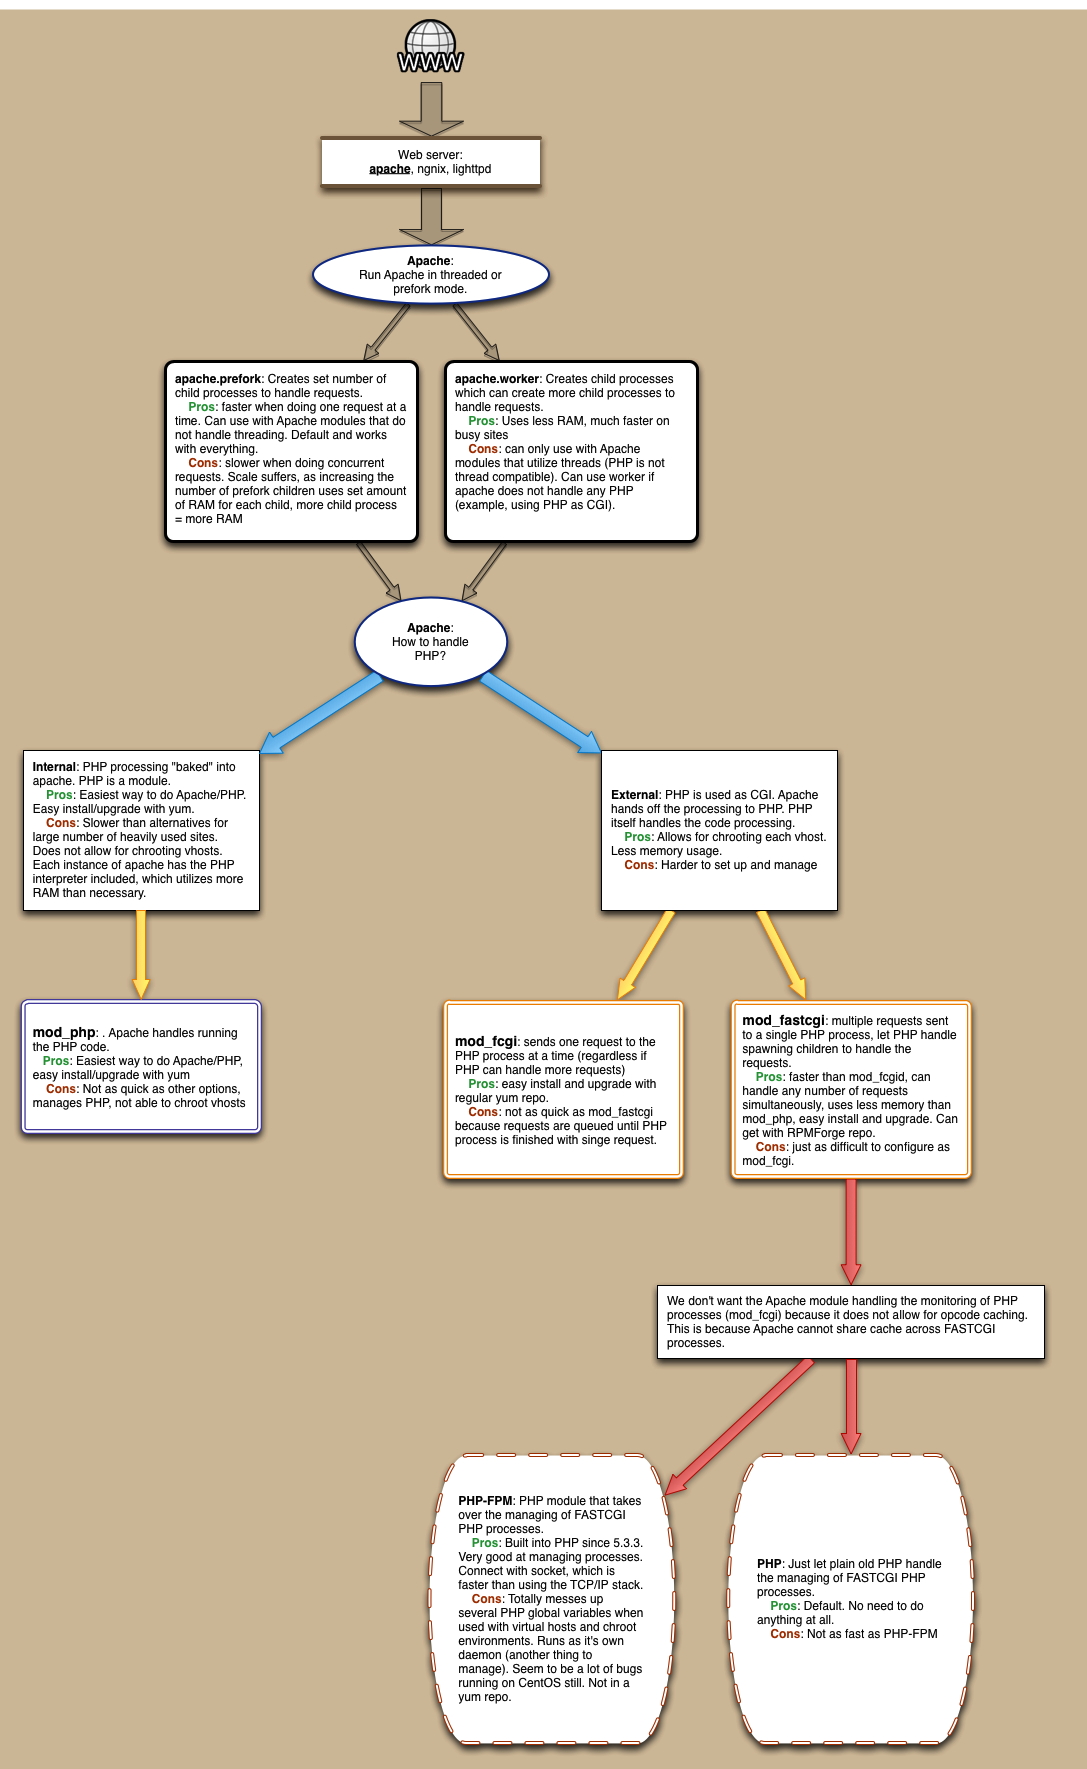
These sites were helpful for the initial set up of PHP as CGI with mod_fcgi and Apache in chroot (mod_fcgi sends one request to each PHP process regardless if PHP children are available to handle more, and no sharing of APC opcode cache across PHP processes):
- http://www.howtoforge.com/how-to-set-up-apache2-with-mod_fcgid-and-php5-on-centos-5.2
- http://forum.linode.com/viewtopic.php?t=2982
This site was helpful for setting up PHP as CGI with mod_fastcgi and Apache in chroot (mod_fastcgi sends multiple requests to a PHP process, so the process can send them to children processes, and having one PHP process for each site allows for APC opcode cache to be usable.)
These sites helped me learn about php-fpm and how it is not quite ready for what I have in mind:
- http://www.makina-corpus.org/blog/install-drupal-php-fpm-fastcgi-apache-and-chroot-php-fpm
- https://groups.google.com/forum/?fromgroups=#!topic/highload-php-en/Uq2MDrudMQ4
I ended up going with Apache’s mod_fastcgi for using PHP as a CGI, and NOT using PHP-FPM, while running Apache in threaded mode with apache.worker enabled.
To get this set up is pretty easy. I already had Apache and PHP installed and running (with PHP as CGI using mod_fcgi), so here are the steps I used to convert it to run mod_fastcgi and apache.worker. I’m running CentOS 6.3.
Install the RPMForge repo for installing mod_fastcgi.
- Get latest from http://repoforge.org/use/ :
rpm -Uvh http://pkgs.repoforge.org/rpmforge-release/rpmforge-release-0.5.2-2.el6.rf.x86_64.rpm yum --enablerepo=rpmforge install mod_fastcgi
Edit the /etc/httpd/conf/httpd.conf file
ServerTokens ProdKeepAlive On- Edit the worker section. I still need to do some testing to figure out the best configuration
<IfModule worker.c> StartServers 8 MaxClients 300 MinSpareThreads 25 MaxSpareThreads 75 ThreadsPerChild 25 MaxRequestsPerChild 0 </IfModule> - If there, make sure to comment out, or delete the lines for mod_php:
LoadModule php5_module modules/libphp5.so - this line also:
AddType application/x-httpd-php .php - The last line should be:
Include conf/virtual_hosts.conf
Create a /etc/httpd/conf/virtual_hosts.conf file
Each virtual host needs to have an entry similar to this in the httpd.conf file, or I like to create a separate virtual_host.conf and include that in the main httpd.conf.
# Name-based virtual hosts
#

# Default
NameVirtualHost *:80

# Begin domain-name.com section
<VirtualHost *:80>
    DocumentRoot /var/domain-name/home/html/
    ServerName domain-name.com
    ServerAlias www.domain-name.com

    # Rewrite domain name to not use the 'www'
    RewriteEngine On
    RewriteCond %{HTTP_HOST}    !^domain-name\.com$ [NC]
    RewriteRule ^/(.*)  http://domain-name.com/$1 [R=301]

    # Specify where the error logs go for each domain
    ErrorLog /var/logs/httpd/current/domain-name.com-error_log
    CustomLog /var/logs/httpd/current/domain-name.com-access_log combined

    <IfModule mod_fastcgi.c>
        SuexecUserGroup domain-name domain-name
        ScriptAlias /cgi-bin/ "/var/www/cgi-bin/domain-name/"
        <Directory "/var/domain-name/home/html">
            Options -Indexes FollowSymLinks +ExecCGI
            AddHandler php5-fastcgi .php
            Action php5-fastcgi /cgi-bin/php-fastcgi
            Order allow,deny
            Allow from all
        </Directory>
    </IfModule>
</VirtualHost>
# End domain-name.com section
Things to note:
- The line with
SuexecUserGroupshould have the user/group for the project.
Create the php-fastcgi file
Add a /var/www/cgi-bin/projectname/php-fastcgi file for each project. This allows php to run as FastCGI, and use suEXEC. The php-fastcgi file needs to be under suexec’s default directory path /var/www/cgi-bin/.
-
#!/bin/bash
#  Set PHPRC to the path for the php.ini file. Change this to
#  /var/projectname/home/ to let projects have their own php.ini file
PHPRC=/var/domain-name/home/
export PHPRC
export PHP_FCGI_MAX_REQUESTS=5000
export PHP_FCGI_CHILDREN=5
exec /usr/bin/php-cgi
Things to note:
- The directory and file created above must be have user/group of the project (the same as the user/group of the /var/projectname/ directory)
- The directory and file must be executable and writable by the owner ONLY.
- If you get Apache Internal Server errors, check
/var/log/httpd/suexec.log - For each site, you can specify how much RAM the APC module can use. For large, busy sites, you set this higher. Not setting this defaults to 64MB, which is a bit more than needed for the average WP site. Change the last line in the
/var/www/cgi-bin/projectname/php-fastcgifile:exec /usr/bin/php-cgi -d apc.shm_size=128M
Change php.conf
Comment out everything in the /etc/httpd/conf.d/php.conf file so php is not loaded as a module when Apache starts.
Apache multi-threaded
Edit the /etc/sysconfig/httpd file to allow Apache to use multi-threaded mode (httpd.worker) which handles basic HTML files much nicer (less RAM). Uncomment the line with HTTPD=/usr/sbin/httpd.worker
Config Check
Check the Apache configuration files to see if there are any errors.
service httpd configtest
If all good, restart Apache
service httpd restartThis will stop the running httpd service, and then start it again. Use this command after installing or removing a dynamically loaded module such as PHP. ORservice httpd reloadThis will cause the running httpd service to reload the configuration file. Note that any requests being currently processed will be interrupted, which may cause a client browser to display an error message or render a partial page. ORservice httpd gracefulThis will cause the running httpd service to reload the configuration file. Note that any requests being currently processed will use the old configuration.
Install APC
pecl install apc
Set up log rotation for Apache
- Add a file
/etc/logrotate.d/httpd.monti -
/var/logs/httpd/*log {
    daily
    rotate 365
    compress
    missingok
    notifempty
    copytruncate
    olddir /var/logs/httpd/archives/
    sharedscripts
    postrotate
        /bin/kill -HUP `cat /var/run/httpd/httpd.pid 2>/dev/null` 2> /dev/null || true
    endscript
}
Long-winded Introduction
It took me a couple of days to figure this out due to lack of decent tutorials and not enough confidence in my Linux skills to build programs from source. I think I have the hang of it now, and write this up with the intent on providing another, or the only, tutorial on setting up CentOS 5 with multiple instances of PHP using one Apache install. That being said, there are a number of good tutorials out there, just none of them explicitly for CentOS and some leave out some details that n00bs like me get confused about.
PHP4 and PHP5 on SuSE 10.1 – This was by far the most helpful of the tutorials. Even though it was written for SuSE, it works almost straight across for CentOS.
There is also a great list of instructions in the comments on the php.net site under installing PHP for Apache 2.0 on Unix systems (see http://www.php.net/manual/en/install.unix.apache2.php#90478).
I found this one after I wrote up this tutorial at http://cuadradevelopment.com. It’s a bit different, but should work as well.
There are basically two different ways I could have done this. 1- run a single instance of Apache, and run one instance of PHP as a module, and other installs as CGI. 2- run several instances of Apache, each with it’s own instance of PHP as a module. I chose to do the first method for no particular reason. Dreamhost has a post about the good and bad with running PHP as CGI.
So basically, the steps are: 1. Set up Apache and have PHP install as a module. 2. Configure and make another instance of PHP to run as CGI. 3. Add a virtual host to Apache running under a different port to access the PHP as CGI.
Set up Apache with PHP module
So here’s what I did to get the basic Apache, PHP and MySQL working. This sets up the first PHP install to run as a module in Apache:
From a clean install of CentOS 5 (virtually no packages selected during initial install), I installed the following packages:
$ yum install gcc make subversion ImageMagick php php-cli php-common php-ldap php-mysql php-pdo php-pear php-devel bzip2-devel libxml2-devel mysql mysql-server mysql-devel mod_auth_mysql httpd httpd-manual
From there I needed to get PHP 5.2.x, so I did the following to get PHP, Apache, MySQL and PEAR all set up.
- Step 1: GET PHP 5.2.x
Check out instructions and packages here: http://blog.famillecollet.com/pages/Config-en$ wget http://download.fedora.redhat.com/pub/epel/5/i386/epel-release-5-2.noarch.rpm $ wget http://rpms.famillecollet.com/el5.i386/remi-release-5-4.el5.remi.noarch.rpm $ rpm -Uvh remi-release-5.rpm epel-release-5.rpm $ yum—enablerepo=remi update php-pear php
Copy the /etc/php.ini file from the /etc/php.ini.default:
$ cp /etc/php.ini.default /etc/php.ini
Change the following lines:
- 1. upload_max_filesize = 20M #line 573
- 2. mysql.default_socket =/path/to/mysql/mysql.sock #about line 736
- 3. mysqli.default_socket =/path/to/mysql/mysql.sock #about line 771
- Step 2:Edit /etc/httpd/conf/httpd.conf by changing the following lines
- 1. Listen xxx.xxx.xxx.xxx:80 #line 134
- 2. ServerAdmin [email protected] #line 251
- 3. ServerName somesite.org #line 265
- 4. DocumentRoot ”/path/to/htdocs” #line 282
- 5. <Directory ”/path/to/htdocs”> #line 307
- 6. AllowOverride All #line 328
- 7. DirectoryIndex index.php index.html index.html.var #line 392
- Step 3: Create the /etc/my.cnf file for MySQL
[code][mysqld] datadir=/path/to/mysql socket=/path/to/mysql/mysql.sock user=mysql # Default to using old password format for compatibility with mysql 3.x # clients (those using the mysqlclient10 compatibility package). old_passwords=1 [client] socket=/path/to/mysql/mysql.sock [mysqld_safe] log-error=/var/log/mysqld.log pid-file=/var/run/mysqld/mysqld.pid
[/code]
- Step 4: Start apache and mysql and set them to start on boot up:
$ service httpd start
$ service mysqld start
$ chkconfig mysqld on
$ chkconfig httpd on
- Step 5: Set the MySQL password for root
$ mysqladmin -u root password ‘XXXXXX’
- Step 6: install Phing and other PEAR packages
$ pear channel-discover pear.phing.info
$ pear channel-discover pear.phpunit.de
$ pear install phing/phing
$ pear install PhpDocumentor
$ pear install XML_Beautifier
$ pear install PHPUnit
$ pecl install Xdebug
Configure second version of PHP
From here we need to install a second version of PHP. Grab the version you want from http://www.php.net/releases/, and stick that any where you want to (usually your root’s home directory is fine). I’m installing PHP 5.2.4, so I’ll use that in my examples.
Unpack the tarball and enter the directory it created.
$ tar -xjf php-5.2.4.tar.bz2
Now, you’ll need to determine which modules you need to install. For this part I used the steps from the php.net comment under “my approach for determining required modules” (copied here, without permission, but with lots of gratitude and full credit going to the author of the comment).
my approach for determining required modules
------------------------------------
1. get the list of the modules
     $  php -m | grep -v -e Modules] -e ^$ > php-default-modules

2. create the configure script
$  for i in $(cat php-default-modules); do echo -n "--with-$i ">> phpconfigure.sh ;done

     2.2 add #!/bin/bash to the top line, and ./configure to the second line.
          Each of the --with-* need to be on the second line.

3. run the configure script, and iterate through the "Configure script errors"
    section below until it completes properly

    $ ./phpconfigure.sh

4. at the end of the output, look for a notice of unknown options

     Notice: Following unknown configure options were used:
     --with-date
     --with-gum-disease

     Check './configure --help' for available options

5. as suggested, execute '$ ./configure --help' and correct the options. The
     "for" command above indiscriminately inserts "--with-" for all modules,
     but bundled modules may require "--enable-" instead, so mostly you'll
     be changing those. For modules that are enabled by default you'll need
     to remove the entry.

6. Add anything else you personally want or need. I like to add "--enable-safe-mode".
After doing all of that, I had the following in phpconfigure.sh
[code lang=”bash”]
#!/bin/bash
./configure –prefix=/usr/share/ –datadir=/usr/share/php –libdir=/usr/share –includedir=/usr/include –bindir=/usr/bin –enable-safe-mode –with-config-file-path=/etc/php542 –enable-force-cgi-redirect –enable-discard-path –with-bz2 –enable-calendar –with-curl –enable-dbase –enable-exif –enable-ftp –with-gettext –with-gmp –with-iconv –with-ldap –with-libxml-dir=/usr/lib/ –enable-mbstring –with-mime_magic –with-mysql –with-mysqli –with-openssl –enable-pcntl –with-pcre-dir=/usr/lib/ –with-pdo_mysql –with-pdo_sqlite –with-readline –enable-shmop –enable-sockets –with-SQLite –enable-wddx –with-xsl –enable-zip –with-zlib
# Changes from what php -m spits out. You don’t need the info below in your phpconfigure.sh script
#–enable-calendar
#–with-ctype # default
#–with-date # not found, default?
#–enable-dbase
#–with-dom # default
#–enable-exif
#–with-filter #default
#–with-ftp
#–with-hash #default
#–with-json #default
#–with-libxml-dir=/usr/lib/
#–enable-mbstring
#–with-memcache #not found, default?
#–enable-pcntl
#–with-pcre-dir=/usr/lib/
#–with-PDO #taken care of with the pdo_mysql and pdo_sqlite
#–with-Reflection #default
#–with-session #default
#–enable-shmop
#–with-SimpleXML #default
#–enable-sockets
#–with-SPL #default
#–with-standard #not found, is it SPL? default?
#–with-tokenizer #default
#–enable-wddx
#–with-xdebug #not found, not needed
#–with-xml #default
#–with-xmlreader #default
#–with-xmlwriter #default
#–enable-zip
#–with-Xdebug #not found, not needed
[/code]
NOTE: make sure you do not include ‘–with-apxs2=/usr/sbin/apxs’. This is what installs PHP as an Apache module. Also, since you have the original PHP running, you can theoretically make a phpinfo file (with phpinfo() ) in it, and grab the configure entries from that, making sure to change ‘–with-config-file-path=/etc’ ‘–with-config-file-scan-dir=/etc/php.d’
During the configure, you might run into some errors. Again from the php.net comment:
Configure script errors
--------------------------------------------
In my experience, these errors have been due (with any software, PHP included) mostly to missing
development packages, which contain the libraries and headers needed to compile support for that
library's function into the application.

This becomes a process of:
-executing the ./configure script and looking at the error
-installing the devel package providing the resource referenced by the error (google using the error
     as search term as needed)
-repeat until the ./configure script makes it through without error

Upshot: identify the software referenced by the error, and install it.

Example
-----------
Example error:
     configure: error: Cannot find OpenSSL's
Example explanation
     configure is looking for a header (and probably a lot of other stuff) from a missing openssl package.
Example solution:
php-5.2.9]$sudo yum install openssl-devel
The previous yum command should take care of most of those dependencies.
After the phpconfigure script runs without errors, then simply run
$ make
As the JpGraph tutorial explains, there is no need to run “make install”. Just simply copy the php-cgi executable to the proper place. We’ll get to that step shortly.
Set up Apache VirtualHost and website directories
Now you need to create two directories to handle the PHP as CGI. They can be virtually wherever, but should be in the same directory where you have the main html content. So if you set the path to the website data (in the httpd.conf) to /path/to/htdocs/, then you’ll need to make a /path/to/php524/ and a /path/to/php524-cgi/
$ mkdir /path/to/php524/
and
$ mkdir /path/to/php524-cgi/
After you have those directories, you can add the VirtualHost information to the Apache config (httpd.conf). I like to have a separate file for the VirtualHosts, so I added this to the end of the httpd.conf file.
Include conf/XXXXX_vhosts.conf
And to allow VirtualHosts, uncomment this line:
NameVirtualHost *:80
To allow Apache to listen on (or accept requests from) different ports besides the default 80, add another Listen line to the httpd.conf file:
Listen XXX.XXX.XXX.XXX:8524
I used port 8524 to correspond to version 5.2.4 of PHP
Now create the XXXXX_vhosts.conf file
[code lang=”bash”]
#this doesn’t really seem to be needed, but it’s there
NameVirtualHost *:8524
# this is the original and runs the PHP as a module
DocumentRoot /path/to/htdocs/
ServerName somesite.org
####### Add other Virtual Hosts below here #######
# Setup PHP 5.2.4 on port 8524
DocumentRoot /path/to/php524/
# We use a separate CGI directory
ScriptAlias /cgi-bin/ /path/to/php524-cgi/
# These are the two critical statements for this virtual
# host. This activates PHP 5.2.4 as a CGI module
Action php524-cgi /cgi-bin/php-cgi
AddHandler php524-cgi .php5 .php
#Options None
Options FollowSymLinks
#AllowOverride None
AllowOverride All
Order allow,deny
Allow from all
# For good measure we also add recognition of PHP5 index
DirectoryIndex index.html index.php index.php5
[/code]
Now, you need to copy the php-cgi binary/executable to the /path/to/php524-cgi/ directory. The php-cgi file is located in the file where you ran the configure and make for the new php install. So if you did all that in the /opt/php-5.2.4/ directory, the php-cgi will be located at /opt/php-5.2.4/sapi/cgi/php-cgi.
$ cp /opt/php-5.2.4/sapi/cgi/php-cgi /path/to/php524-cgi/
Finally, copy the php.ini file to the right place. And configure as needed.
$ cp /opt/php-5.2.4/php.ini-dist /path/to/php524-cgi/php.ini
Test the apache configs to make sure they work:
$ /usr/sbin/apachectl configtest
If that returns OK restart Apache.
$ /etc/init.d/httpd graceful
You can make a phpinfo page to test that it’s using the new PHP version.
[code lang=”php”]
< ?php
phpinfo();
? >
[/code]
Then check out your new site: http://somesite.org:8524/phpinfo.php
In order to get the different versions of PHP to interact with MySQL, you’ll have to use the URL on port 80 as the MySQL host. So, for example, in a WordPress install at http://somesite.org:8524/blog, the wp-config.php will have to have the following for the MySQL hostname:
define('DB_HOST', 'dev.omeka.org');
There is some issue with mod_rewrite on the different versions of PHP. I’ll replace this paragraph with a fix when I have one.
UPDATE: 9/9/09 – I figured out how to get the .htaccess working for the Omeka installs we were working with. I needed to change the AllowOverride lines in the vhost.conf (or httpd.conf) file from None, to All.
Well, there you go. Hope that’s enough detail to get you going.
]]>