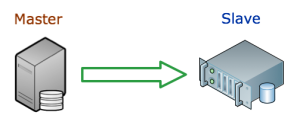
I’m trying this new idea for backing up our production MySQL servers. I have a backup server that basically runs rdiff-backup in the morning across several servers, but then does nothing for the rest of the day. It’s a pretty decent machine, so I’d like to utilize some resources. Replicating a MySQL server is a good way to ensure High Availability in case of a failure. The backup server acts as a slave to the master (production) server. Basically, the slave is an exact copy of the master. They are two separate instances of MySQL server running on two physical servers. Whatever queries run on the master are sent to the slave so it can do the same. This way they are kept completely in sync. You could also have the slave take over for the master, should the master server happen to fail.

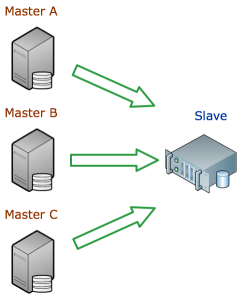
The only problem I face with this set up, though, is that I have multiple production servers out there. So this only works if this backup server could be a slave for multiple machines.

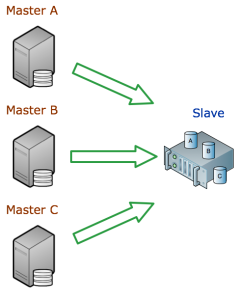
This is not possible, though, because, of course, no slave can serve two masters. Fortunately, a server can have multiple instances of MySQL running on it! So, in a sense, we have a server with multiple MySQL instances, to which a master can replicate. More about that set up in an upcoming post.

A how to on this blog, shows how this can be done. I’ll replicate the process below.
STEPS TO MULTIPLE MYSQL MADNESS
On the slave server
Step 1. Install MySQL
We’ll be working with CentOS 5.8, but this could really apply for any OS. First we’ll need to install MySQL like normal.
yum install mysql mysql-server
There are plenty of good tutorials out there on how to install the specific version of MySQL you want on the specific OS you’re running.
Step 2. Set up the data area.
You’ll need to have a different folder for each of the MySQL instances, say /dbases/master-a/, /dbases/master-b/, and /dbases/master-c/.
mkdir -p /dbases/{master-a,master-b,master-c}
Step 3. Copy the default my.cnf file
This is the default MySQL config file, it may be named differently on other OSes.
cp /etc/my.cnf /etc/master-a.cnf; cp /etc/my.cnf /etc/master-b.cnf; cp /etc/my.cnf /etc/master-c.cnf
Step 4. Edit the new MySQL config files.
For each new config file, you’ll need to specify some unique variables.
[mysqld]
port=3307
datadir=/dbases/master-a
socket=/dbases/master-a/mysql.sock
user=mysql
server_id=3307
log-bin=/dbases/master/mysql-bin.log

# Disabling symbolic-links is recommended to prevent assorted security risks;
# to do so, uncomment this line:
symbolic-links=0

[mysqld_safe]
log-error=/dbases/master-a/mysqld.log
pid-file=/dbases/master-a/mysqld.pid
The port option sets this MySQL instance on a different port than the default 3306. The datadir, socket, log-bin, log-error, and pid-file options make sure the necessary files are not using the default files.
Step 5. Create new init scripts.
The init script allows the server to start and stop the service at boot time, and allows for easy start up and shutdown (on CentOS/RedHat, at least – with an easy service mysqld start).
cp /etc/init.d/mysqld /etc/init.d/mysqld-master-a
Just do one for now. We’ll copy the new one to create the others, then just do a quick search and replace in those files to change the master-a to master-b and master-c.
Step 6. Edit the init script
#!/bin/bash # # mysqld This shell script takes care of starting and stopping # the MySQL subsystem (mysqld). # # chkconfig: - 64 36 # description: MySQL database server. # processname: mysqld # config: /etc/master-a.cnf # pidfile: /dbases/master-a/mysqld.pid # Source function library. . /etc/rc.d/init.d/functions # Source networking configuration. . /etc/sysconfig/network prog="MySQL" # extract value of a MySQL option from config files # Usage: get_mysql_option SECTION VARNAME DEFAULT # result is returned in $result # We use my_print_defaults which prints all options from multiple files, # with the more specific ones later; hence take the last match. get_mysql_option(){ result=/usr/bin/my_print_defaults "$1" | sed -n "s/^--$2=//p" | tail -n 1if [ -z "$result" ]; then # not found, use default result="$3" fi } get_mysql_option mysqld datadir "/dbases/master-a" datadir="/dbases/master-a" get_mysql_option mysqld socket "/dbases/master-a/mysql.sock" socketfile="/dbases/master-a/mysql.sock" get_mysql_option mysqld_safe log-error "/dbases/master-a/mysqld.log" errlogfile="/dbases/master-a/mysqld.log" get_mysql_option mysqld_safe pid-file "/dbases/master-a/mysqld.pid" mypidfile="/dbases/master-a/mysqld.pid" defaultfile="/etc/master-a.cnf" start(){ touch "$errlogfile" chown mysql:mysql "$errlogfile" chmod 0640 "$errlogfile" [ -x /sbin/restorecon ] && /sbin/restorecon "$errlogfile" if [ ! -d "$datadir/mysql" ] ; then action $"Initializing MySQL database: " /usr/bin/mysql_install_db --datadir="$datadir" --user=mysql ret=$? chown -R mysql:mysql "$datadir" if [ $ret -ne 0 ] ; then return $ret fi fi chown mysql:mysql "$datadir" chmod 0755 "$datadir" # Pass all the options determined above, to ensure consistent behavior. # In many cases mysqld_safe would arrive at the same conclusions anyway # but we need to be sure. /usr/bin/mysqld_safe --defaults-file="$defaultfile" --datadir="$datadir" --socket="$socketfile" \ --log-error="$errlogfile" --pid-file="$mypidfile" \ --user=mysql >/dev/null 2>&1 & ret=$? # Spin for a maximum of N seconds waiting for the server to come up. # Rather than assuming we know a valid username, accept an "access # denied" response as meaning the server is functioning. if [ $ret -eq 0 ]; then STARTTIMEOUT=30 while [ $STARTTIMEOUT -gt 0 ]; do RESPONSE=/usr/bin/mysqladmin --socket="$socketfile" --user=UNKNOWN_MYSQL_USER ping 2>&1&& break echo "$RESPONSE" | grep -q "Access denied for user" && break sleep 1 let STARTTIMEOUT=${STARTTIMEOUT}-1 done if [ $STARTTIMEOUT -eq 0 ]; then echo "Timeout error occurred trying to start MySQL Daemon." action $"Starting $prog: " /bin/false ret=1 else action $"Starting $prog: " /bin/true fi else action $"Starting $prog: " /bin/false fi [ $ret -eq 0 ] && touch /dbases/master-a/mysqld return $ret } stop(){ MYSQLPID=cat "$mypidfile" 2>/dev/nullif [ -n "$MYSQLPID" ]; then /bin/kill "$MYSQLPID" >/dev/null 2>&1 ret=$? if [ $ret -eq 0 ]; then STOPTIMEOUT=60 while [ $STOPTIMEOUT -gt 0 ]; do /bin/kill -0 "$MYSQLPID" >/dev/null 2>&1 || break sleep 1 let STOPTIMEOUT=${STOPTIMEOUT}-1 done if [ $STOPTIMEOUT -eq 0 ]; then echo "Timeout error occurred trying to stop MySQL Daemon." ret=1 action $"Stopping $prog: " /bin/false else rm -f /dbases/master-a/mysqld rm -f "$socketfile" action $"Stopping $prog: " /bin/true fi else action $"Stopping $prog: " /bin/false fi else ret=1 action $"Stopping $prog: " /bin/false fi return $ret } restart(){ stop start } condrestart(){ [ -e /dbases/master-a/mysqld ] && restart || : } # See how we were called. case "$1" in start) start ;; stop) stop ;; status) status mysqld ;; restart) restart ;; condrestart) condrestart ;; *) echo $"Usage: $0 {start|stop|status|condrestart|restart}" exit 1 esac exit $?
Step 7. Start each MySQL instance.
Now you can start each instance with the handy service command.
service mysqld-master-a start
Step 8. Connect to MySQL instances.
Now, to connect to each MySQL instance, you’ll need to specify the port and/or socket file.
mysql -P3307 --socket="/dbases/mysql-master-a/mysql.sock"


Hi ammon,
that was quite descriptive. I was just wondering, if you have tried out mysqld_multi instead of this approach. Any thoughts?
I had not looked into mysqld_multi. Not sure I knew about it. I will have to take a look at it, though.
action $”Initializing MySQL database: ” /usr/bin/mysql_install_db –datadir=”$datadir” –user=mysql
should be changed, –defaults-file=”$defaultfile” is required to create proper new mysql instance:
action $”Initializing MySQL database: ” /usr/bin/mysql_install_db –defaults-file=”$defaultfile” –datadir=”$datadir” –user=mysql